Lesson 15: Layer on layer with z-index (Layers)
Lesson 15: Layer on layer with z-index (Layers)
CSS operates in three dimensions - height, width and depth. We have seen the first two dimensions in previous lessons. In this lesson, we will learn how to let different elements become layers. In short, this means the order of which the elements overlap one another.
For that purpose, you can assign each element a number (z-index). The system is that an element with a higher number overlaps an element with a lower number.
Let us say we are playing poker and have a royal flush. Our hand can be presented in a way where each card has got a z-index:
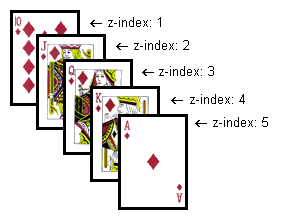
In this case, the numbers follow on another (1-5) but the same result can be obtained by using 5 different numbers. The important thing is the chronological sequence of the numbers (the order).
The code in the card example could look like this:
#ten_of_diamonds { position: absolute; left: 100px; top: 100px; z-index: 1; } #jack_of_diamonds { position: absolute; left: 115px; top: 115px; z-index: 2; } #queen_of_diamonds { position: absolute; left: 130px; top: 130px; z-index: 3; } #king_of_diamonds { position: absolute; left: 145px; top: 145px; z-index: 4; } #ace_of_diamonds { position: absolute; left: 160px; top: 160px; z-index: 5; }
- Show example
The method is relatively simple but the possibilities are several. You can place images on text or text above text etc.
Summary
Layers can be used in many situations. For example, try to use z-index to create effects in headlines instead of creating these as graphics. For one thing, it is faster to load text and for another, it provides a potentially better ranking in search engines.


